Partner Solutions Sites
New Partner Site Checklist
- Have Mkt Carrier Program Manager or the Account Manager fill out intake questions
- Have Mkt Carrier Program Manager or the Account Manager get visual branding guidelines and branding assets
- Logo files -- we will have to provide specifications (dimensions); these can be found in the control panel)
- Hex codes for web accessible colors and color guidelines
- 5-10 images for use on site (e.g., stock photography)
- Printed pdf design
- Get new MindTouch site provisioned
- Configure variables
- Configure classifications
- Provision users
- Recreate custom templates
- Copy in HTML head
- Build category pages
- Prepare content for new site
- Conditional content for any implementation quirks (e.g., no debit)
- Conditional content for any products they won’t offer
- Build CSS for new site
- Digital - all roles
- Add in styles to hide products this partner doesn't offer (see below)
- Create new header and footer templates
- Get new domain added to SSL (or purchase new SSL)
- Get additional license for Dinkytown calculators
- Work with Blue Cross security to have this site added to OKTA and ServiceNow (for provisioning users)
- Coordinate DNS change with MindTouch—includes adding it to content publisher/migration tool
- Add branding elements to site configuration page
- Update learning site links in member and group portals for this group
- Set up Analytics on new site
- Use importer to send content to the new site
- Build/update learning paths
- Make the site public
- Test links
Intake Questions
When you need to request a new partner solutions learning center (internally referred to as a white-labeled site), please provide answers to the following questions:
- Name of partner:
- Group or distribution partner code from SAM:
- Name of learning site (typically this will be learn-name.hellofurther.com; please confirm this is acceptable):
- Go-live date for learning site:
- Further products (list all):
- If HSA, what plans will they offer, and will they be customizing any of the plan names?
- Will this plan allow debit cards? If so, how many, what kinds?
- Will this plan allow automated claim payment (crossover)? Any quirks?
- Will they need branded mutual funds lists from Devenir? If so, HSA, VEBA, or both?
- Will they need the Charles Schwab site branded?
- Do they want our calculators?
- URLs for the partner's web properties that we will link to (in both learning site and member portal--please list all):
- URLs for any tools/partner sites they would like featured for members in the member portal:
- Will we be creating a mobile app for this partner, and if so, when would it be available?
- Are they OK with us surfacing decision support tools (currently "Pick Your Price" and "Doctor on Demand") in the member portal?
- Will they have special call center hours?
- What will be the phone numbers for the following:
- Member call center
- Group call center
- Agent call center
- Sales
- What will be the email addresses for the following:
- Sending forms
- Group support
- Sales email
- What will be the fax number for groups?
- URL for signing in to portal (if SSO):
- For members
- For groups
- Any other steps users must take to SSO into our portal (e.g., click "My Accounts")
- For members
- For groups
- Other needs (if any):
In addition to this info for content, we'll also need logo files, brand guidelines, any images they want incorporated, etc.
New Site URL
Once the learning site URL for the new partner has been decided, we need to:
- Update our CNAME to point to the MindTouch load balancers (work with Prasad Bonasu, Paul Eberle, and CC Brad Czaplewski.
- Have MindTouch make the DNS switch and add the new URL/endpoint to the content migration tool
MindTouch needs 5 days' notice for adding this new URL to the migration tool.
Preparing Content
The following tools are available for configuring content for a new partner site.
Styles to hide irrelevant products
Our guide pages are organized by tags, automatically generating lists for each tag given to any article contained within the guide. To prevent a tag list from appearing for a partner who won't find that particular tag applicable (e.g., VEBA), we add styles to the CSS file to hide those products. Copy and paste the following text into the CSS file, and then remove the styles for each product the partner is KEEPING:
/*HIDING ALL TAGS FOR PRODUCTS THEY DON'T HAVE ON THE GUIDE PAGES*/

.mt-tag-directory-listings.mt-guide-listings li.mt-listing-no-break.mt-tag-name-hra {
display: none;
}

.mt-tag-directory-listings.mt-guide-listings li.mt-listing-no-break.mt-tag-name-hsa {
display: none;
}

.mt-tag-directory-listings.mt-guide-listings li.mt-listing-no-break.mt-tag-name-fsa {
display: none;
}

.mt-tag-directory-listings.mt-guide-listings li.mt-listing-no-break.mt-tag-name-veba {
display: none;
}

.mt-tag-directory-listings.mt-guide-listings li.mt-listing-no-break.mt-tag-name-tra {
display: none;
}

.mt-tag-directory-listings.mt-guide-listings li.mt-listing-no-break.mt-tag-name-dcap {
display: none;
}
Variables
- Sign in steps (in case of SSO; can direct members to sign in at one place and have to navigate to our portal)
- Forms fax #
- Group, agent, member phone numbers
- Group and sales emails
- Portal URL (in case SSO)
Conditions
We tag content with conditions to control whether it shows up in a partner learning center or the Further learning center. In order to conditionalize the content, you wrap tags around it in the HTML view.
Setting up conditions for a new partner
For each new partner site, we'll add two conditional logic options:
- In: The "in" condition will be named "[partner-name]-condition". It dictates that the content ONLY appears for the partner site. The logic says: "show this text only if the URL includes the partner's name."
- Out: The "out" condition will be named "not[partner-name]-condition". It dictates that the content does NOT appear for the partner site. The logic says: "show this text if the URL does NOT include the partner's name."
If content appears for all sites, it doesn't get a condition. If you write content specifically for one partner, it gets that partner's "in" condition. If you need to hide content from a partner site, it gets that partner's "out" condition.
Code that gets applied (background info)
I’ve set up a style in the editor to make this easier, but here's how it all works in the code.
Conditions are applied to div tags, so we can only condition blocks of content (whole paragraphs) and not sentences. The code that gets applied will look like this: 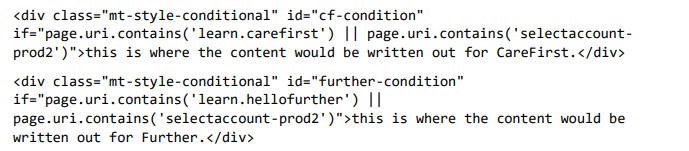
Editing/troubleshooting the editor style
Here's an article on adding styles to the editor: https://success.mindtouch.com/Suppor...custom_conditional_content_groups
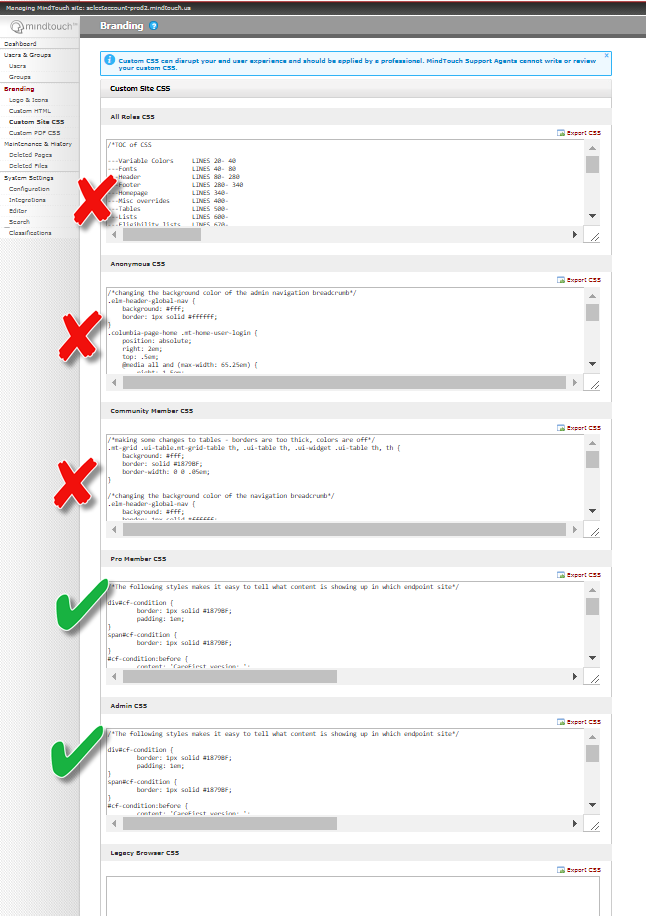
When adding a new condition, place it right before/above the last closing curly bracket. You can follow the format of the existing conditions. Note that a '!' provides "NOT" logic for the condition. You will also need to add CSS styles for the new logic--these styles must be added for pro members and admin members in the CSS.
Conditionalizing content for the new partner
When we need to prepare for a new partner site, we need to find all existing conditional content and decide what applies to this partner. We'll also need to find any other content that must be conditionalized for them (content that may not have been restricted for a previous client). To find currently conditionalized content:
- Go to Site tools > Dashboard > Page Classification Manager
- Set the filters at the top of the page to:
- Conditions: Yes
- Go through each article in the list and apply any of the newly created conditions for the partner as needed--you can find instructions for this below.
- When you have updated a page, set the status to Ready to Publish.
Similarly, if you update a page that did not previously have any conditional content in it, set the page settings to:
- Conditions: Yes
- Status: Ready to Publish
Applying an editor style
When you need to conditionalize content, use the following steps:
- Edit the page
- In editing mode, put your cursor in front of the content you want to condition.
- In the editing toolbar, click the Styles dropdown.
- Select the conditional block style.
- Cut and paste (or select, then drag and drop) the content into the conditional block.
I’ve also styled the output of this conditioning so that as a logged in pro member, you can see what content goes where. This content will appear like normal for our members.
Nesting conditional logic
Conditions get more complicated as we add more partner-branded outputs. Rather than building out more and more logic, we will simply nest conditions.
If content needs to be hidden for two partner sites (e.g., two carrier partners are not offering a debit card), then nest two "out" conditions, like this:

Nesting two "in" conditions doesn't really work with the way our conditions are built. Nested conditions serve to further limit content inclusion, so in order for two nested "in" conditions to work, they can't be mutually exclusive and the inner condition would need to be more specific than the outer condition. Use "out" conditions to make this work. For example, if content applies to two partners, apply "out" conditions to filter out all other partners. Below is an example, which would leave the content for Further and CapitalBlue only. Tip: When nesting conditions, flip to the source/HTML view of the editor before building the next condition. This will apply the styles that make it clear where the conditions are, and also provide space for your next nested condition to go (a place to put your cursor).
Sometimes the only way to delete an errant line break left by applying a condition is to go into the source/HTML view and delete the <p>nbsp;</p> causing the line break.
Publishing conditionalized content
When content has been prepared for the partner site, you need to publish the changes. You might end up publishing all pages for the new site at once. If you need to publish only the conditionalized content, you can find it using these steps:
- Go to Site tools > Dashboard > Page Classification Manager
- Set the filters at the top of the page to:
- Conditions: Yes
- Status: Ready to Publish
- Go through and publish each page in the list.
Notes for writing with multiple sites in mind
Some clients (CareFirst) have two debit cards. When writing about the debit card, avoid the need for subject verb number agreement (e.g., "The Further debit card lets you" --> "You can easily XYZ with the Further debit card"; Generally this will help us avoid passive language, too).
How to acquire a license for the new site's calculators
Our vendor is Dinkytown calculators and our account representative is Karl Ebert.
Contact him at ebert@dinkytown.net and let him know about the new site and need for calculators. He can also be reached by phone at (612) 331-2291. He will let us know how much we will need to pay for the additional calculators.The price will depend on how many of the calculators the partner wants to add to their site.
We will need to submit a funding request, and that funding comes from the IT cost center.
When the calculators are ready, we will receive an email from Karl with download instructions.